Domo is a veteran business-intelligence platform trusted by large enterprises for deep, real-time analytics. But data only drives action when people actually see it. By pairing Domo with Screenly, you can surface KPI dashboards on hallway monitors, office TVs, or any connected display, so insights are always in sight.
Below is a concise walkthrough for publishing a Domo dashboard on a Screenly digital sign.
Pair a Screenly Anywhere screen with your online account
If you’re new to Screenly, start with a free 14-day trial (no credit card needed). Existing users can simply log in and open their Screenly dashboard view. Once you are at your Screenly dashboard:
- Click Screens in the lefthand sidebar.
- Choose Add Screen or + New Screen.
- Select Screenly Anywhere, which isour browser-based player that runs on any device with a modern browser.
- On the device you’ll use as a sign, visit anywhere.screenly.io and copy the pairing code.
- Paste the code into your Screenly account, give the screen a name (e.g., Domo Display), then click Add.
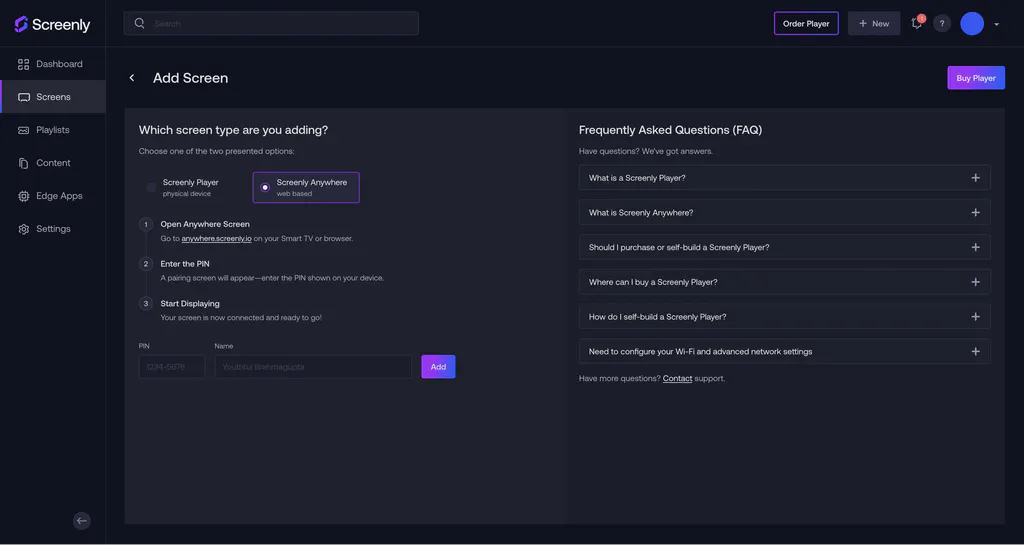
Your screen is now paired to your account andready to receive content.
Generate a public embed link in Domo
Open a new tab and sign in to your Domo workspace.
- Navigate to the dashboard you want to publish.
- Click the Share icon, but instead of “Share" in the submenu, choose Domo Everywhere.
- Next, in Embed Options, set the access level to Public.
- Copy the Embed URL.
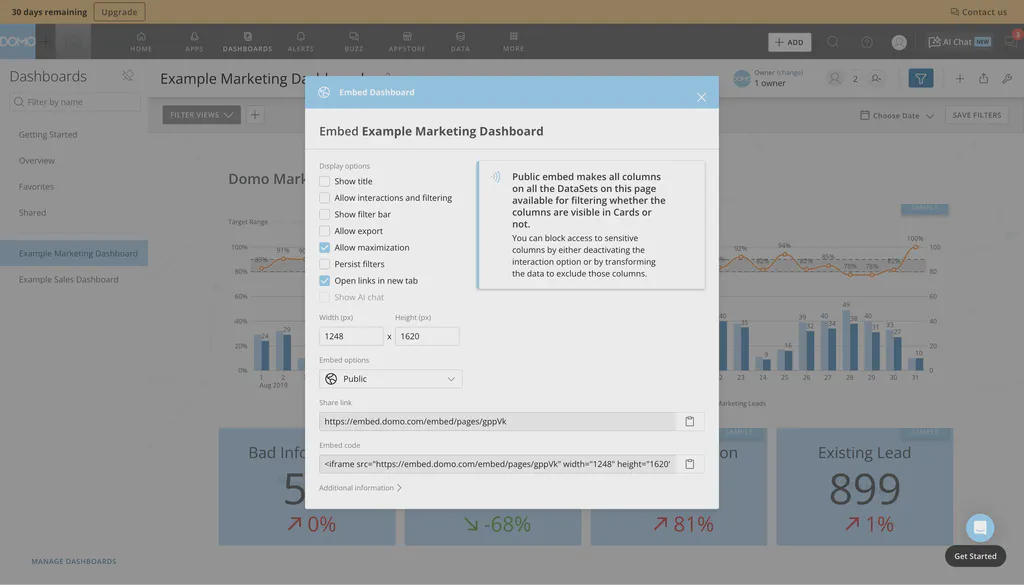
Trouble finding the link? In More → Admin → Domo Everywhere → Settings, make sure click the checkbox on Allow public embedding of Cards and Dashboards is enabled. Then, click Embed on the lefthand side of the screen, then click Dashboards on the right side. Tick your dashboard and choose Edit on the top right. In the popup modal, select Public under the Update Embed Type dropdown.
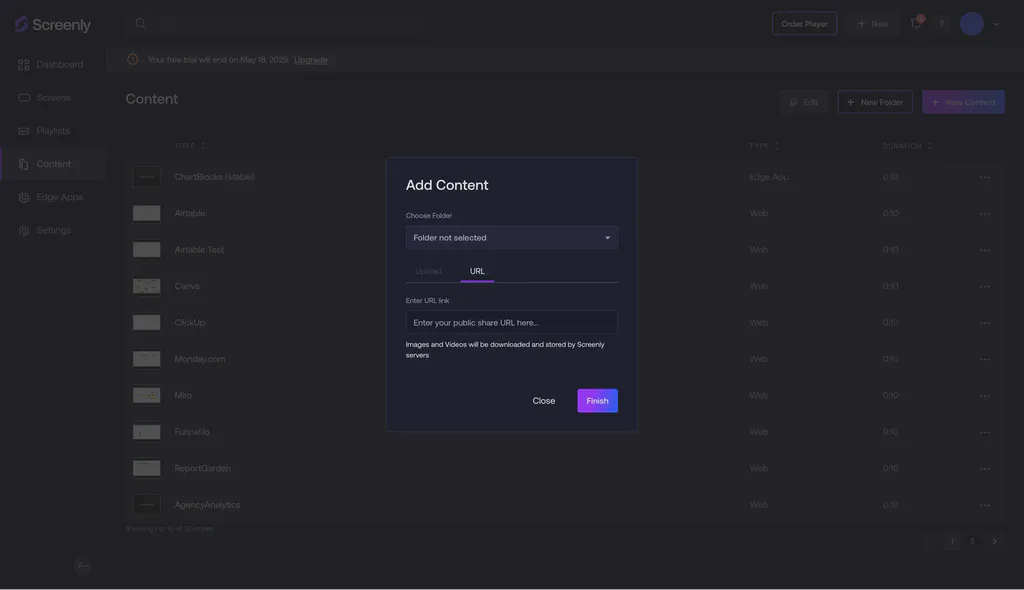
Add the Domo link as content in Screenly
Now that you have your Domo embed link, you can add it as content in Screenly. Back in your Screenly dashboard:
- Click Content in the lefthand sidebar menu.
- Hit + New Content (top right).
- Select URL in the modal.
- Paste your Domo embed link and click Finish.
- Name the item (e.g., Domo Dashboard) and click Save.
Now that we have your Domo content added to your Screenly account, you can build a playlist and assign it to a screen.
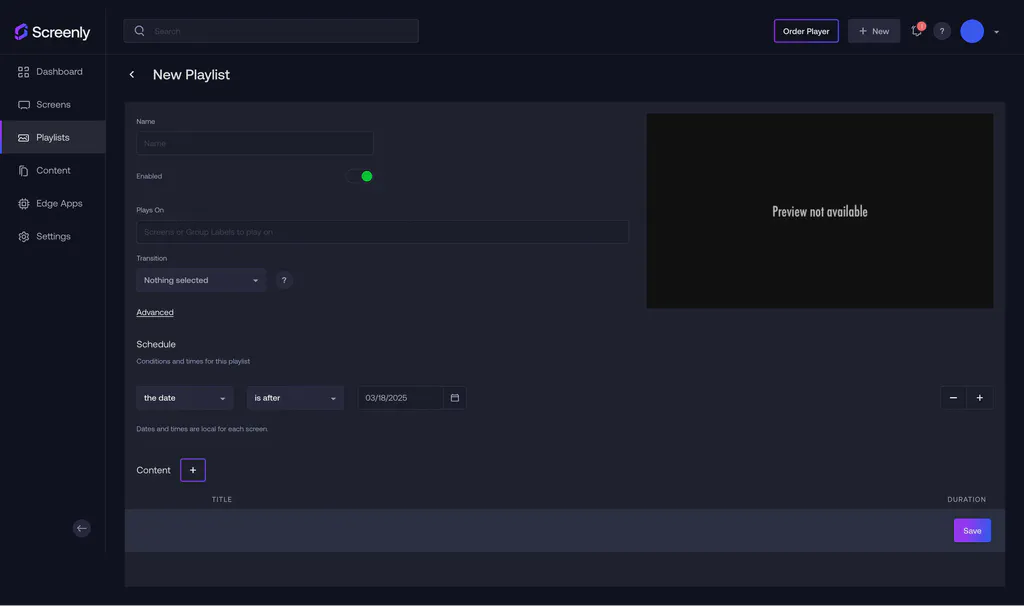
Build a playlist and assign it to a screen
To build a playlist and assign it to a screen, complete the following steps:
- Go to Playlists in the sidebar.
- Click + New Playlist.
- Name it Domo Playlist.
- Under Plays On, pick the screen you paired earlier (e.g., Test Screen).
- Click the + next to Content and select your Domo item.
- Set the Start Time to before the current moment so it begins right away.
- Optionally, adjust the content Duration (e.g., 30 seconds).
- Click Save.
That’s it! Your Domo dashboard is now assigned to a playlist and will display on your Screenly digital sign shortly.
See your Domo dashboard live
Open the Screenly Anywhere tab on your display. Your Domo dashboard should appear full-screen and refresh automatically according to your Domo settings and as your data changes.
Need to roll this out company-wide? Just repeat the screen-pairing step for each location and assign the same playlist. Screenly scales seamlessly.
Elevate your data visibility today
Domo delivers powerful analytics; Screenly ensures those insights are impossible to miss. Unite the two to keep teams focused on the metrics that matter, from boardrooms to break rooms.
Ready to try it? Start your Screenly free trial, add a screen, and broadcast your Domo dashboard today.
Questions? Reach out to Screenly Support. We’re here to help.