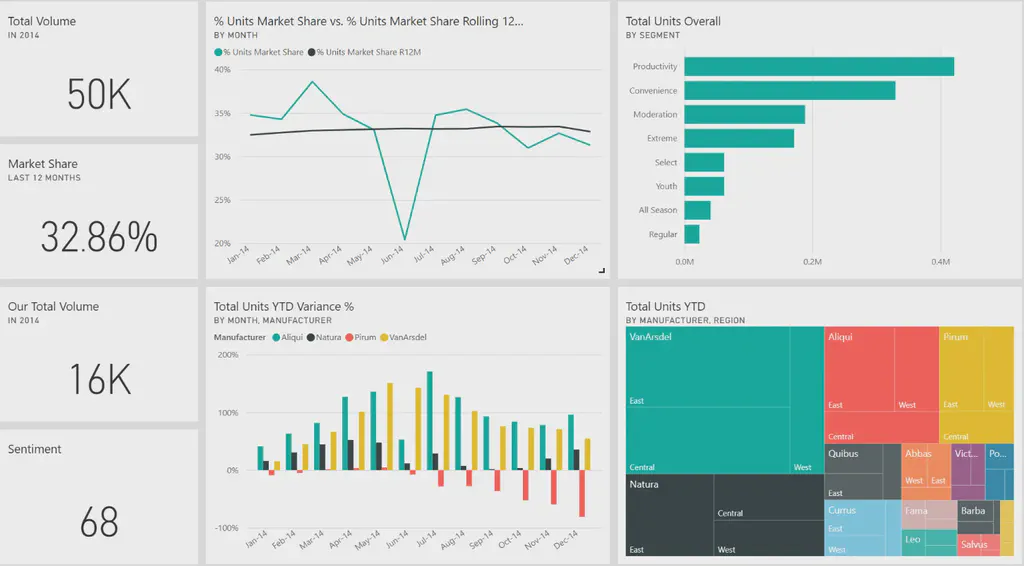
Microsoft Power BI is one of the most powerful and popular data visualization tools on the web. With Power BI, users can create stunning dashboards and populate those dashboards with real time data. By combining Power BI dashboards with Screenly digital signs, teams can display key business metrics to the entire team on a central, easily-viewable digital sign. In the steps below, we detail how you can start displaying your Power BI dashboards on a Screenly digital sign in minutes.
Depending on how sensitive your dashboard is, you can choose one of the methods below. We recommend using the App approach, since it is the most secure method. This approach was developed for Fortune 500 companies with strict security requirements, and has passed security compliance from their security teams.
If you are using Power BI, it is strongly recommended that you use a Screenly Player Max, as the Screenly Player (or DIY Raspberry Pis) will struggle to load many Power BI dashboards.
Using Power BI Screenly App
The corner stone of this approach leverages the security features in our Apps. This means that the sensitive data (i.e. Oauth 2.0 Client Credentials) are never exposed to the browser, and encrypted using the TPM (on the Screenly Player Max).
You can display Power BI dashboards in Screenly using either the Latest Power BI App or the Legacy Power BI App . Each option offers a different setup experience depending on your integration preferences.
The latest version streamlines the setup with direct account integration, allowing you to complete the entire process in just two simple steps.
Connect the Power BI Integration
Log in to your Screenly account.
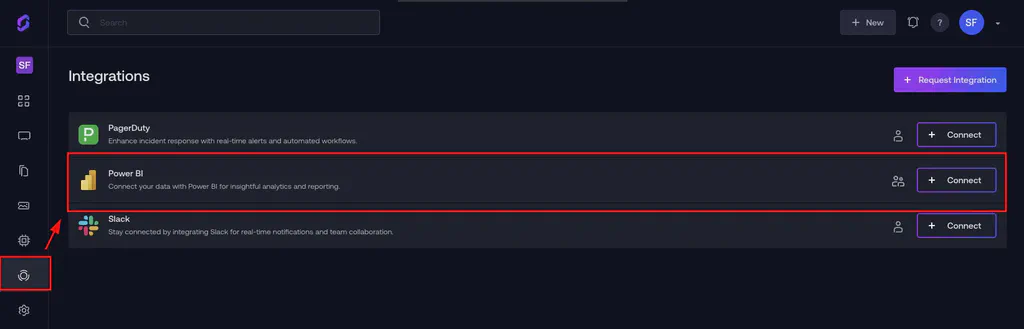
Go to Integrations.
Click Power BI.
Sign in using your Microsoft account to authorize the connection.
📝 NOTE: Only the account owner can view and connect the Power BI integration. Once the integration is added, other team members will be able to create and install the Power BI App on their own
Install the Power BI App and select the dashboard you want to display
Once the integration is connected, open the App Store.
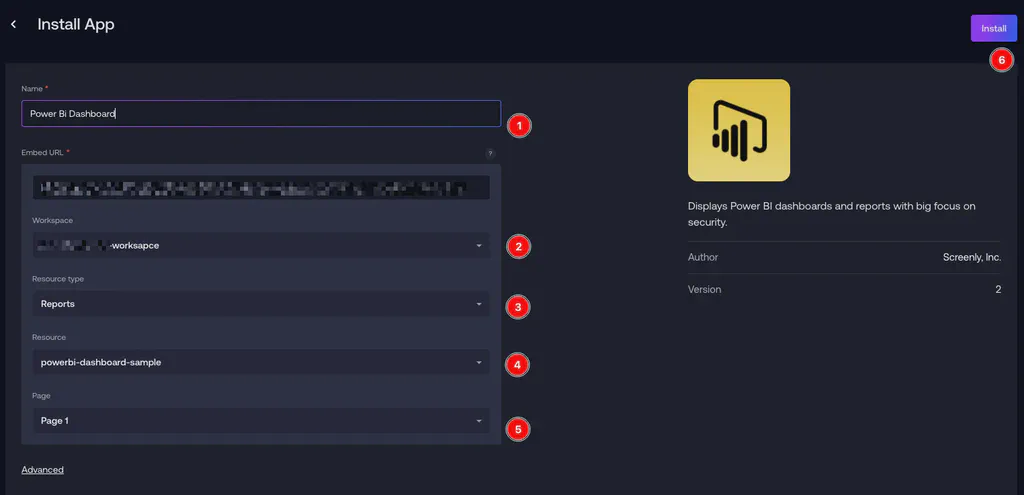
Search for the Power BI App, enter a Name [1] and click Create to proceed.
Choose your Workspace [2], Resource Type [3], Resource [4] and Page Number [5] from the drop down.
click Install [6].
After that, add the Power BI App asset to a playlist, and then link that playlist to a screen for display.
Using Legacy Power BI App
📝 NOTE: We suggest using the Power BI App with Power BI account integration for a quicker, more reliable, and easier setup experience.
To get started, you need the folowing
- A Client ID and Client Secret for an Azure AD application
- The Tenant ID for your Azure instance
- The Group ID (also known as Workspace ID) for the Power BI dashboard
- The report or dashboard ID
You can reference the documentation from Microsoft, but in simple terms, you need to:
- Register an Azure AD application
- Create a Power BI workspace (if you don’t already have one)
- Make sure that the service principle has API access to Power BI’s API
- Grant access to the Azure AD application has workspace access in Power BI
Reports vs Dashboards
In Power BI, a report is like a detailed story about your data with multiple views and deep interactions, made using the main Power BI tools. On the other hand, a dashboard is a single-page summary that shows key points from one or more reports, put together online in Power BI. Think of reports as detailed books and dashboards as quick summaries or highlights.
When configuring the App, you need to specify if you are using a report or dashboard.
Using the App Store (recommended)
To install the Power BI App, you first need to have acquired all the information above. Armed with this information, it’s quick to install the actual App.
Navigate to “Apps” in the left-hand menu, press “+ App” and select “Power BI”.
You will need to provide the following values to install your App:
azure_ad_client_idazure_ad_client_secretazure_ad_tenant_idpower_bi_group_idpower_bi_resource_idpower_bi_resource_type- Optional:
power_bi_page_name- This is used to select a tab in a report or dashboard with multiple pages. Note that this is not the name of the tab. Instead, you need to use the
ReportSectionpart of the URL, such asReportSection50033...a22c.
- This is used to select a tab in a report or dashboard with multiple pages. Note that this is not the name of the tab. Instead, you need to use the
Once you have pressed ‘Install’, you should be able to find your App under the Content section. You can then schedule it in a playlist just like you can with a regular content piece.
Using the CLI
- First, install the Screenly CLI
- Clone or download the Playground repository
cd edge-apps/powerbi
screenly edge-app create --name "My Power BI Dashboard" --in-place
screenly edge-app upload
With the App uploaded, it’s time to configure it.
This is where we need to use the settings from above, namely:
azure_ad_client_idazure_ad_client_secretazure_ad_tenant_idpower_bi_group_idpower_bi_resource_idpower_bi_resource_type
To set these, we again use the CLI. All but the azure_ad_client_secret are “settings,” so let’s start by setting the secret:
screenly edge-app secret set azure_ad_client_secret=[redacted]
Now, we can continue with the settings:
screenly edge-app setting set azure_ad_client_id=[redacted]
Rinse and repeat for all of the remaining settings.
Once you’re finished, you’ll need to create an instance of the app. An instance is a unique installation of an App, and each instance can have its own settings and secrets. This allows you to run multiple instances of the same App with different configurations.
screenly edge-app instance create --name=EDGE_APP_INSTANCE_NAME
You should now have an asset named My Power BI Dashboard (stable) in your web console.
Using Public URL
Getting a public URL for your Power BI dashboard
To use less sensitive dashboards you can create an access URL to your dashboard. To do so, open your dashboard and click on the “File” dropdown. Next, click the “Publish to web” icon. If you are not an admin of your business’s Microsoft account, you may need to get admin access yourself or find your business’s admin user. You can find our more about sorting out admin access here.
Once you have admin access, you will see the “Embed in a public website” popup modal. Click the “Create embed code” option. Next, in the “Embed in a public website” popup, you will see a warning about how the dashboard will be viewable via a public link. Make sure that this is OK with your organization and then click “Publish.”
In the next popup that loads, you will see two boxes. You will see a “Link you can send in email” and a “HTML you can paste into your blog or website” box. Select the “Link you can send in email” option. This link will share a full-screen view of your Power BI dashboard. Only choose the link in the “HTML you can paste into your blog or website” if you have an advanced use case where you want to adjust the sizing of your dashboard.
Add your Power BI dashboard URL to your screen
Now that you have a public URL for your Power BI dashboard, the next step is to add the URL as content to your online Screenly account. To do so, login to your Screenly account here. Next, click the “Content” tab on the left-hand side of the screen. Once you are on the Content page, click the “+ New Content” button on the top right.
You will then see the “Add Content” popup modal. Click the “URL” tab, and add your public URL for your Power BI dashboard in the “Enter URL link” input box. Next, click the “Finish” button on the bottom right of the popup modal. After your URL link uploads to your account, you can then change the content title in the “Title” input box. To finish adding your Power BI dashboard link, click “Save” on the bottom right of the screen.
Next, you will then need to create a playlist and add your Power BI playlist to the screen. To learn more on this step, check out our video on how to create a playlist with Screenly. Once you have a playlist, you can add that playlist to a screen. For more information, see our videos on how to add a new screen and how to add content to your screen. Once you assign a playlist containing your Power BI dashboard to your screen, your Power BI dashboard will then display on your TV or monitor in minutes.
Getting started with Screenly
If you do not have a Screenly account already, you can get started with a 14-day free trial account. We do not require a credit card for a trial account. Take a look inside, add your Power BI dashboards, and set up your first screen with a digital signage player.
If you have any trouble getting your Power BI dashboard to display on your screen, contact Screenly Support at any time. We are always happy to help!